
Welcome to Nova Recruiter — your AI-powered platform for finding and engaging top talent.
This guide walks you through the full setup so you can go from zero to your first campaign in under 30 minutes.
1. Access your account
Nova Recruiter is fully web-based — no installation or downloads required.
- Go to recruiter.novatalent.com and create your account.
- Set your new password and log in.
- Need access for team members? Contact us success@novatalent.colm and we'll sort it out
2. Complete your profile
Before sourcing, take two minutes to fill in your profile — this helps candidates understand who's reaching out and increases response rates.
- On the home page, find your company details in the top-left corner.
- Click Edit to open your recruiter profile.
- Fill in all three sections: You, Your Company, and Your Team
3. Explore the platform
Click "Find Talent" from your home screen to land on the Nova Recruiter dashboard. Here's what you have at your disposal:
4. Connect your tools
Go to Settings (bottom-left corner) → Connections. Before you can run any campaign, you need to connect at least your email and LinkedIn.
⚠️Don't skip this step: Without these connections, you won't be able to send campaigns or contact candidates. It's the most common reason users don't get results from their first campaign.
Available channels:
-
Gmail or Outlook: Sends outreach emails through your account in campaigns.
-
LinkedIn; Sends outreach emails through your account in campaigns.
- Nova Community: Access Nova's exclusive network of 25,000+ pre-vetted professionals for additional outreach reach.
- ATS Connect: Connect your ATS for a fully integrated workflow. Read more →
🔒 Your data is safe. Nova never stores your LinkedIn credentials. Email is connected via OAuth — we send on your behalf but never read your inbox. Read our Security & Privacy Guide →
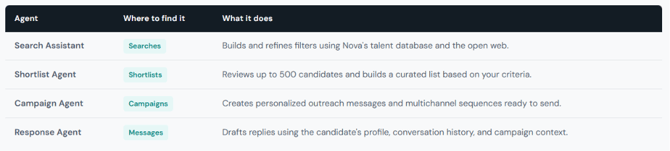
5. The four AI Agents
Nova Recruiter is built around four AI agents — one for each stage of your workflow. You don't have to use them all; every step can also be done manually.
6. Your fist Search
From the left sidebar, click Searches, then click (+) in the top-right corner. A chat-style prompt will appear asking: "Who are you looking for?"
You can start your search in two ways:
PATH A - Recommend
-
🤖 Search with AI Assistant: Describe the candidates in plain lenguage and le the AI set the filters, score matches and deliver a ranked list in minutes.
Read more →

PATH B
-
👆🏻Manual search: Set filters by yourself
Read more →
7. Review profiles
your search runs, Nova returns a ranked list of candidates scored by the AI. Each card shows the candidate's current role, location, years of experience, and an AI-generated summary
⚙️ Want to understand how results are ranked?
Nova uses a two-step process — filtering first, then ranking. You can change the sort order (Relevance, Fit, Nova Talent Score, Novas first) at any time from the dropdown in the top right.
Read the Search Engine guide →
Before adding candidates to your shortlist, open a profile to review their experience, skills, education, and LinkedIn. Use the ‹ › arrows to browse candidates and the Seen/Unseen filter to keep track of reviewed profiles.
8. Build your shortlist candidates
When you're ready to build your shortlist, you have two options:
PATH A
-
🤖 Build with AI Agent: The shortlist Agent reviews up to more than 500 candidates and build a curated list based on your criteria, with your approval.
Read more →
PATH B
-
👆🏻 Build manually: Review profiles one by one and add candidates as you go, full control.
Read more →
💡 Need your shortlist outside Nova? You can export any shortlist you've created as a CSV whenever you need it.
PATH C
-
💻 Import an existing shortlist: Already have your shortlist? Import it into Nova to start reviewing launching outreach campaigns
9. Outreach: Create campaigns and contact candidates
⚠️Only connected channels will appear
The outreach channels shown in your campaign are the ones you've already connected in Settings → Connections → Connect your contact channels
Read more →
Once you have a shortlist, campaigns let you contact candidates through a personalized, multichannel sequence across LinkedIn, Inmails, email, and Nova's own network — with follow-ups handled automatically.
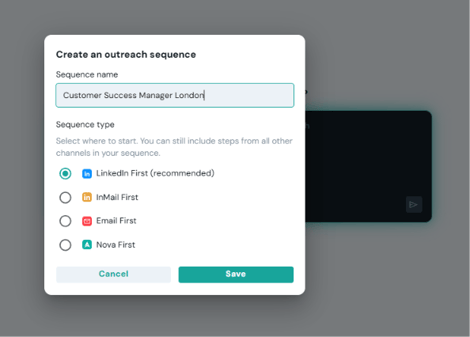
- From the left sidebar, click Outreach → + New Outreach Sequence.
- Enter a sequence title and choose the starting channel. You can add additional channels later in the sequence.
- Let the Campaign Agent generate personalized messages. Provide the required information, including the desired tone, key details, and the action you want candidates to take.
- Select the shortlist(s) for your sequence by clicking + Add Lists. You can choose one or multiple lists.
- Configure your sequence by enabling or disabling channels as needed. For Gmail and LinkedIn, you can also choose the number of follow-up messages from the dropdown menu.
- Review the messages generated by the Campaign Agent. Click on each sequence step to view the full message. You can edit any message or enable custom candidate messages. For more details, see the Outreach Guide.
- Click Activate Campaign. Message delivery and follow-ups will be handled automatically.
Want the full outreach sequece guide?
Read more →
10. Check and control your inbox
Every reply from a candidate lands in your Messages inbox — centralized across all channels. No switching between LinkedIn and email; everything is in one place.
- From the left sidebar, click Inbox. All your conversations are displayed in one place. Use the tabs at the top to filter messages by LinkedIn, Nova, or Email.
- Select any conversation to view the full message history with that candidate.
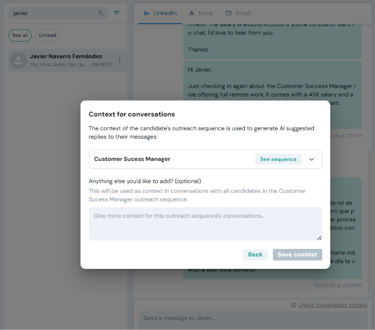
- Click Check Conversation Context to add extra information that wasn't included in your outreach sequence, such as common questions candidates ask or additional details about the role. This context helps the Response Agent generate more accurate and personalized replies.
- The Response Agent will automatically suggest a reply based on the conversation and your campaign context. Review the message, edit it if needed, or write your own response before sending it.
- Once you're happy with the message, click Send to reply to the candidate.
Ready to start hiring smarter?
You've got everything you need. Jump into Nova Recruiter and run your first search.
→ Open Nova Recruiter