
⬇️ Before you start You need at least one connected channel (email or LinkedIn) and a shortlist with candidates to contact.
Connect your tools →
1. Create a new outreach sequence
From the left sidebar, click Outreach, then click (+) in the top-right corner to create a new sequence.
- Enter a sequence name for your own reference. Candidates won't see it.
Next, choose how you'd like your outreach sequence to start:
- LinkedIn First – Begin by sending a LinkedIn connection request before moving to other channels.
- InMail First – Start with a LinkedIn InMail message.
- Email First – Send an email as the first touchpoint.
- Nova First – Reach out through Nova's network before using other channels.
Click Save to continue configuring your outreach sequence.
💡 Your starting channel only defines the first step. You'll still be able to configure the rest of the sequence and include additional channels (Email, LinkedIn, InMail, or Nova) in the following steps.
2. Define the role and messaging
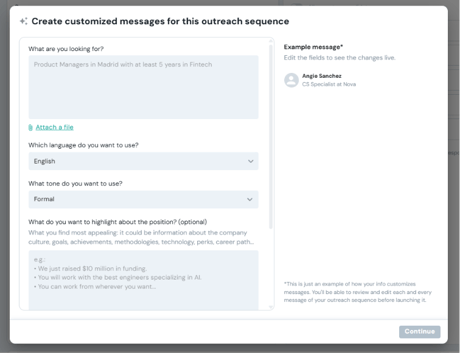
This information gives the Outreach Agent the context it needs to generate personalized messages. The more details you provide, the better the results.
Required — Role summary
Describe the role in your own words, highlighting the main responsibilities, requirements, and what makes the opportunity attractive. This summary gives the Outreach Agent the context it needs to generate personalized messages.
Optional — Add a job description
If you already have a job description, you can upload it as a PDF. The Outreach Agent will extract the key information and use it to further personalize your outreach messages.
Required — Language & tone
Choose the language for your outreach and define the tone of voice—formal, friendly, or somewhere in between. The Outreach Agent will adapt the writing style accordingly.
Optional — Role highlights
Add any key selling points you'd like to emphasize, such as remote work, company stage, growth opportunities, equity, or team culture. These details help make your messages more engaging.
Optional — Salary range
Include the salary range if you're comfortable sharing it. Leave this field blank if you'd rather not mention compensation.
Required — Desired candidate action
Choose the action you want candidates to take after receiving your message:
- 💬 Reply — Start a conversation.
- 📅 Book a call — Schedule a meeting directly.
- 🔗 Apply — Submit an application through a link or ATS.
Click Continue to move on to the sequence setup.
3. Configure your channels and sequence
You'll now see the complete sequence overview, including the communication channels you've connected, the audience for your sequence, and the messages that will be sent through each step.
💡 Only connected channels are available
You'll only see channels that you've already connected. If a channel is missing, go to Settings → Connections and connect it before continuing.
Add your shortlist
Before launching your sequence, select the shortlist(s) you want to contact.
Click Add or edit and choose one or more existing lists. All candidates in the selected lists—including any candidates you add later—will automatically become part of the audience for this outreach sequence.
💡 You can add multiple shortlists to the same sequence, making it easy to reach candidates from different searches or projects.
Review the sender
The Send as field shows which connected account will send the messages.
⚠️ Once the outreach sequence has started, the sender cannot be changed.
Configure the sequence steps
Below, you'll see every step in your outreach sequence.
Enable or disable each step depending on how you want to contact candidates.
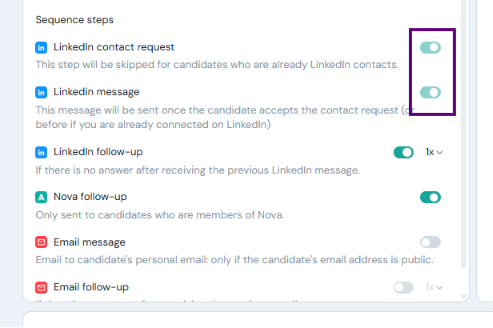
You can use a single channel or combine multiple channels for greater reach.
Set follow-ups
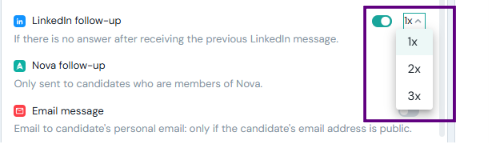
Follow-up messages are available for LinkedIn and Email.
For each enabled channel, choose how many follow-up messages you'd like to send (up to three). Follow-ups are sent automatically if the candidate doesn't respond to the previous message.
💡 The outreach sequence automatically stops for a candidate as soon as they reply through any channel.
Review your messages
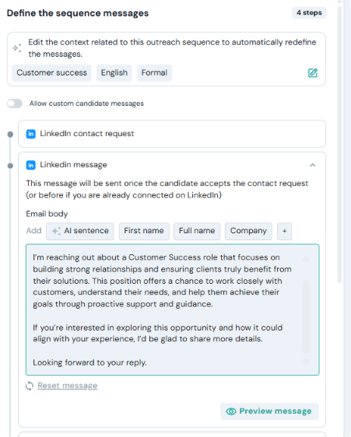
On the right side of the screen, you'll find every message the Outreach Agent has already generated for your sequence.
Before launching your sequence, you can:
- Review each message individually.
- Edit any AI-generated content.
- For follow-up messages, choose how many days Nova should wait before sending each follow-up after the previous step has been completed.
- Update the context at any time by clicking Edit context. The Outreach Agent will automatically regenerate the messages using the updated information.
- Preview the full sequence before sending.
Personalize messages for individual candidates
Need to tailor a message for a specific candidate?
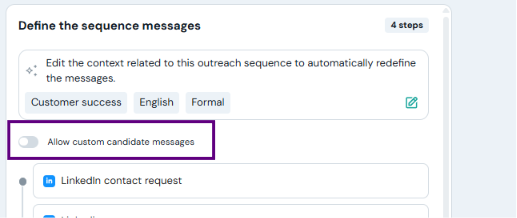
Enable Allow custom candidate messages, select the candidate from the dropdown, and edit their messages without affecting the default sequence used for everyone else.
💡 Custom messages only apply to the selected candidate. All other candidates will continue to receive the default sequence.
Use dynamic fields
You can personalize your outreach even further by inserting dynamic fields into your messages.
Available placeholders include:
- First name
- Full name
- Company
- Role
- Location
- Years of experience
- Recruiter first name
- Recruiter full name
- Recruiter email
- Day of the week
These fields are automatically replaced with the corresponding information when each message is sent, making your outreach feel more personal without requiring manual edits.
4. Save and launch your outreach sequence
Once you've finished reviewing your messages and configuring your sequence, click Save.
Your outreach sequence will become active and Nova will automatically start contacting candidates from your selected shortlist(s), following the order, timing, and channels you've configured.
After launching your sequence, you can return to the Outreach section at any time to:
- Monitor the status of each outreach sequence.
- Track candidate engagement and replies.
- View progress for every client or project.
- Pause, resume, or update your active sequences whenever needed.